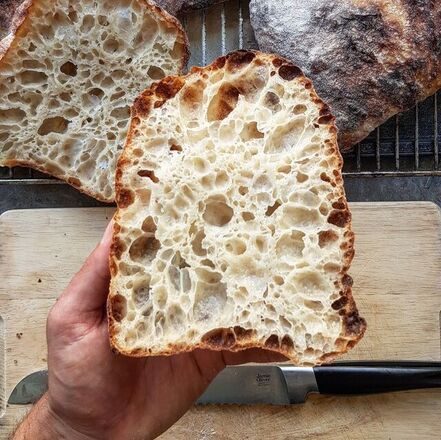
 Here is a recipe for a perfect ciabatta bread! Ciabatta means "slipper" and is so named because it's flat, oval shape resembles a well-worn slipper. It is from Veneto in the north of Italy. It's crunchy and brown on the outside and bubbly and fluffy on the inside. This ciabatta bread makes great sandwiches or can be eaten even as a daily bread served just with extra virgin olive oil. This is a bread with a very high content of liquid and therefore a very hard bread to make by hand if you are a beginner. It is a very wet and sticky dough so if you prefer feel free to use a kitchen aid but do not be tempted to add more flour or it will change the dynamic of this great recipe and you will lose that perfect open crumb texture! If you are a beginner we suggest you to try first our Easy Ciabatta recipe. Makes 2 large Ciabatte Ingredients
Method

33 Comments
20/1/2023 10:20:38 am
If you are talking about Sourdough Starter then It's about 35% in this recipe. It's probably the highest amount of Sourdough starter I would use in a recipe.
Mel
2/2/2021 09:00:40 pm
AMAZING recipe. I LOVE this dough - so easy to work with! I didn’t do the slap and fold, instead I did the Rubaud method. The finished bread was light, airy, chewy, and just a hint of sourdough. But the entire family loved it and my 5yr old can’t stand sourdough or super chewy/crunchy bread - she LOVED this! Will definitely make this again. So good! 20/1/2023 10:23:16 am
Thank you so much for your comment Mel! It's not an easy one to make, but it looks like it was for you! Feel free to tag us and share your ciabatta bread with us on instagram or facebook, we would love to see the outcome.
Rina
4/2/2021 09:03:30 pm
I have been baking with sourdough starter for 4 years now & everyone loves fresh bread in our Italian origin family. Pizza, baguettes, fruit bread, focaccia, crumpets....now ciabatta! 20/1/2023 10:25:22 am
Grazie Rina! Great to hear you loved the recipe! Feel free to tag us and share your ciabatta bread with us on instagram or facebook, we would love to see the outcome.
Tracy
27/10/2023 01:38:18 am
How do you make a sour dough starter
Elaine
11/4/2021 05:49:43 am
Hi, can you share your starter recipe, please. I’m still looking around your site. Thank you. 20/1/2023 10:36:31 am
Hey Elaine, please check out our blog post "All you need to know about Sourdough Starter" ( https://www.ourcookingjourney.com/blog-articles/all-you-need-to-know-about-sourdough-starter ).
John A Nevin
10/9/2021 12:00:43 am
Unless my scale went haywire, this recipe has nowhere near enough flour. I get the point of high hydration to achieve the right crumb, but my dough was practically soup until I added 50 more grams of flour. Proofing now, fingers crossed on how it turns out when I bake tomorrow.
Lucia
3/11/2021 03:35:41 pm
My dough mixture was also like soup. Recipe doesn’t work, and I wonder if American flour could be that much different.
Ken
30/12/2021 07:49:38 pm
The "soup" will become dough through diligent stretching/folding. I have also had great success whipping the dough in a KitchenAid mixer with the whip attachment; it takes 10-15 minutes of high-speed whipping to coalesce, but the result is dough like nothing I have seen before! 20/1/2023 11:09:34 am
Hey Lucia! Thanks for your comment. Same for you as per John experience above. If you don't have much experience of handling a dough like this by hand then try using a KitchenAid. I know it is a very wet dough but don't be tempted to add any extra flour as it will change the outcome. Lastly make sure you are using a very strong good quality flour. 20/1/2023 11:15:38 am
Thank you Ken! And very well said. Let us know how did the outcome of the ciabatta was by sharing it and tagging us on Instagram and Facebook! We would love to see it! 20/1/2023 11:17:04 am
Hey John! Thanks for your comment. I hope it turned out well at the end? This recipe has been tested few times and the measurements are correct. The recipe have a very high content of water compare to any other recipe you have probably tried before, so I can understand if you have found yourself into getting the right gluten structure at the beginning.
John Nevin
30/12/2021 11:17:08 pm
Thanks for the update regarding the "soupy" nature of this dough. Will try the method recommended using my Kitchenaid.
Carol
7/3/2022 03:51:09 pm
What a messy Blob!!! I have wasted hours of my life I’ll never get back tending to this Blob, I even added more flour and it’s no going anywhere…. I’ve made ciabatta’s before and they were never like this. This recipe is taking up time and space on my device so I’ll hit the Delete on this one! 👎🏻👎🏻👎🏻 20/1/2023 11:41:37 am
Hey Carol! I'm sorry you had a terrible time making this recipe. It is quite hard to make this recipe especially if you never had experience before with this type of very wet dough.
Patricia
23/3/2022 07:23:53 pm
Turned out great. Too bad I can’t send pictures. I have been making bread with levito madre for about a year now.
Carol
13/7/2022 11:48:57 pm
I just googled what Lievito Madre is, and I must say, I’m intrigued! I will make this over the next few weeks! It might be a more robust starter- sounds like it! 20/1/2023 11:46:19 am
Hey Patricia, thank you for your comment. We would love to see the outcome, feel free to share it and tag us on Instagram and Facebook!
Liz little
9/6/2022 11:41:34 pm
I’m trying out this recipe right now, it is very soupy couldn’t really do the slap method.. it was more like pour n scoop pour n scoop, we’ll see after the coil folds.. will keep y’all posted.
Carol
13/7/2022 09:38:40 pm
This recipe was a fail for me. It’s possible that my starter was a little weaker than usual, or I really think that I just don’t do well with high hydration kind of bread dough. I might try it again with a stronger starter, but won’t get my hopes up. I wish the author of this recipe would comment on some of these reviews, that would be nice. 20/1/2023 11:50:45 am
Hey Carol, thank you for keeping us posted.
Liz little
24/7/2022 03:51:40 pm
Tried this recipe again this time I added more flour.. first time it was too soupy to do the slap method so I add about a cup more as I slapped and folded till I got a good consistency. 20/1/2023 12:01:37 pm
Hey Liz. Thank you for your comments.
Vidar
2/2/2023 04:50:51 pm
Really good one. I’ve made this several times and it works perfectly. I do not relate to the negative comments above. 3/2/2023 07:43:58 am
Great to hear Vidar! We would love to see the outcome. Feel free to share it and tag us on Instagram and Facebook!
Joan
15/9/2023 05:57:03 pm
I whipped this up in Step 4, but wondering where to use the olive oil.
Teri
27/10/2023 03:01:15 am
50/50 water and bread flour, by weight.
Jen
5/3/2024 09:02:55 pm
Hello! Could you possibly be more specific on the kind of flour? Or the protein content of the flour? I used bread flour at 12.7% protein content and mine came out like soup as well, even after all the attempts at stretch and folds. I measured all ingredients exactly, and my house is not humid. Any help would be appreciated. Thank you! Leave a Reply. |