Our Cooking Journey
  • Home
  • About
  • Contact
  • Recipes
  • Food Blog
  • An Italian Journey
  • Classes and Courses

Fresh Semolina dough (perfect for making orecchiette pasta!)

10/5/2019

1 Comment

 
Easy Orecchiette recipe
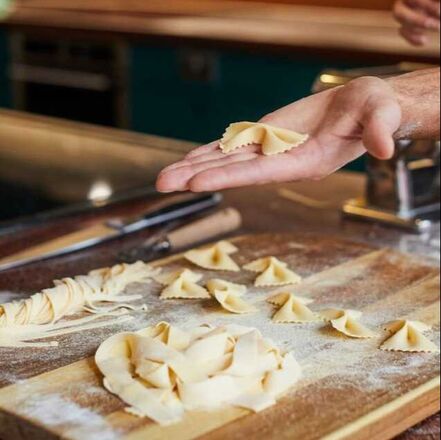
This type of pasta dough is made with durum wheat semolina and water and is a southern Italian speciality. Plus, because there are no eggs in the recipe, it's easier to preserve!
This dough is so simple to make and you can simply let it dry on a wooden board for a few hours to produce the perfect ''al dente'' consistency.

This dough is absolutely perfect for making filled pasta (for example culurgiones) or orecchiette, trofie, fusilli or cavatelli - the possibilities are endless.
Check out the recipe here, where we'll show you how to make the dough as well as a couple of common pasta shapes. Let's get cooking!
All you need is:
  • 200 g of durum wheat semolina  and extra for let the pasta dry on top. 
  • 100 ml of warm water 
This recipe will make enough fresh pasta for 2-3 people.

The cooking process:
  1. Add the semolina to a bowl, then slowly add the warm water into the middle of the flour like a little volcano and stir with a fork.
  2. As soon you have a kind of crumble dough, transfer the compost on your work table. 
  3. Using both hands, start kneading the dough, stretching it and folding it back on itself. 
  4. If the dough is a little sticky, add a pinch of semolina and knead again until it's less sticky; vice versa if the dough is too dry add one or two table spoon of water in the dough and keep kneading. Remember, if you add too much semolina to the dough it will become very dry and impossible to work with, so add semolina only if you need it and if the dough is too wet to work with.
  5. Knead the dough for about 8  to 10 mins. You know your dough is ready when is nice and smooth with a little bounce back if you poke it with your finger and it should feel like a play dough.
  6. At this point cover the dough with cling film and let it rest for 30 mins in the fridge. The dough can be kept in the fridge for a maximum of 2 days.
  7. If you are in a hurry, you can leave the dough to rest outside the fridge for at least 5 mins, but always cover it in cling film. 
  8. Once your dough rested is ready for you to shape it! Enjoy. 
​
Next: Shaping your pasta
  1. You can do many shapes of pasta with this type of dough and you can go on our IG profile by clicking here where Fran shows many different shapes. 
  2. If you would like to make orecchiette, (which means "little ears" in Italian!), it's very simple! All you need to do is to roll a section of dough into a long sausage shape and evenly cut the roll into little pieces of dough. 
  3. Now, to give it the right shape, you'll need a butter knife.
  4. ​Drag the serrated edge of the knife forward across each ball of dough (image 1).
  5. Allow the dough to be stretched under the knife and it will curl in on itself (image 2).
  6. Pick up the little ball of dough and turn it over your finger so that will create a concave shape (images 3 and 4).

​Let your orecchiette dry on a wooden board for a few hours with a little sprinkle of semolina underneath.
You can cook the orecchiette straight away but for the perfect consistency, you want to let them dry first.

Now, show us what you can do!
Picture
Picture
Picture
Picture
1 Comment
Casey
20/7/2019 08:56:03 am

Thank you for sharing the pictures on how to shape the orecchiette. Time to bring Italy home for dinner.

Reply


Leave a Reply.

  • Home
  • About
  • Contact
  • Recipes
  • Food Blog
  • An Italian Journey
  • Classes and Courses