Our Cooking Journey
  • Home
  • About
  • Contact
  • Recipes
  • Blog
  • Cooking Classes
  • Corsi di Cucina

Easy White Sourdough Bread

20/4/2020

4 Comments

 
Picture
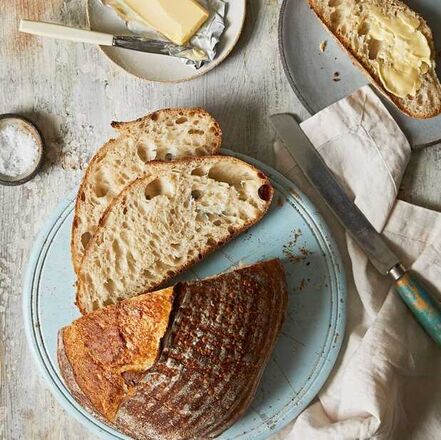
As all you bread fans know, there is so much love and attention behind a sourdough bread. Here we share with you a tried and tested recipe so that you can try make one for yourself.

​Makes 1 homemade white sourdough bread 
​If you don't have a sourdough starter click here for a easy white bread recipe using dry yeast ​

Ingredients
  • 400g of strong white bread flour 
  • 260g + 25g ​ of lukewarm water  
  • 150g of sourdough culture (nice and bubbly) 
  • 10g of sea salt 

Method
  1. To start pre-measured all of the ingredients. 
  2. In a bowl add the lukewarm water and the sourdough starter. With one hand mix well until all the the sourdough dissolves. Now add all the flour and mix well for 5 minutes, with one hand hold the bowl and the other one knead, until there are no more bits of dry flour.
  3. Transfer the dough onto a work surface and start kneading the dough with the palms of your hands - be energetic and a little fast with your kneading movement. Help yourself with a dough scraper if you need a little help! Knead for another 6 - 7 minutes. 
  4. Once the dough it's nicely kneaded and elastic,  with the help of the scraper make a ball shape and transfer the dough to a plastic container or bowl. Cover and let it rest for 1 hour.
  5. Dissolve the salt in 25g of warm water. Pour the salt water on the dough and complete a set of Stretch & Fold with a total of four sets every 45 minutes. To Stretch & Fold the dough, wet your hand with a little bit of water and grab the dough at one side, lift it up, and fold it over on top of itself. Fold the dough four/five times, moving clockwise from the top of the bowl. After the last set, cover and rest once more for 45 minutes.​
  6. TIP. We suggest to keep the dough in a warm and wet environment for the best result. Usually in bakeries is often used, during winter, a dough proofer which is a warming chamber used to encourages fermentation of dough by yeast through warm temperatures and controlled humidity. You can do the same at home leaving the dough inside your oven or microwave at 25-27°C with a cup full of hot boiling water inside to help to create humidity. Cover the dough at all time and once you put the cup of boiling water inside the oven or microwave do not open it until next step so you won't loose any of the humidity and warm temperature. Change the water in the cup with new boiling water every time you open the oven for the next step. 
  7. Lightly dust a proving basket with rice flour. Alternatively, use wholemeal flour. If you don’t have a proving basket, use a bowl and line it with a clean tea towel always using some rice flour. 
  8. After the last set and its 45 minutes rest, lift the dough onto a lightly floured surface so that the smooth side is facing up (be gentle to avoid deflating the dough). Shape the dough into a round shape by slipping your pastry scraper under the edge of the dough and then scraping it around curve of the dough. If you don't have a scraper then cup your palms around the dough and rotate it against the counter to shape it. The skin will stretch until the dough looks plumb and holds its shape. Be careful not too overdo this step or the skin of the dough might tear. If you're using an oval shaped basket or bowl, make sure you shape your dough into an oval shape instead. 
  9. Once you got a nice shape, dust the dough all over with some extra white flour and transfer it to the proofing basket. Place in the basket/bowl with the smooth side facing down. Cover the proofing basket or bowl with a clean plastic bag or shower cup and let the dough proof for 4 to 5 hours at room temperature.
  10. For a slow rise, place the dough in the fridge overnight or for around 12 hours - this will improve the flavour and aroma of your bread. If leaving to rise overnight in the fridge, bake the loaf straight from the fridge. 
  11. Place your casserole or tray into the oven and pre-heat to 230° C fan. Once the oven is hot, tip the loaf on top of a floured board and using a razor lame or sharp knife score the top of the dough. TIP - Try to score at a slight angle, so you're cutting almost parallel to the surface of the loaf; this gives the loaves the distinctive "shelf" along the score line.
  12. Place the loaf in the casserole (dusted with flour) and close the lid, or place on a tray with a separate tray filled with water on a lower rack. Bake for 25 min. Remove the lid or water tray and bake for another 25 min at 190°C (fan) or until the crust is nicely golden and caramelised. Don't be scared to have some colour on your bread, this is where a lot of the flavour and texture of the crust comes in. 
  13. Transfer the bread to a cooling rack and let it cool completely for at least 1- 2 hours. This will improve the aroma and the flavour of your bread as the crumb is still cooking. Enjoy! 
​​
Back to recipes
4 Comments
Nikki Boyages link
27/4/2020 05:25:05 am

Hi,
Thanks for the sourdough recipe. After you add the salt you note to replace dough in bowl & cover. How long do we leave before the next step? Thanks in advance, Nikki

Reply
Our Cooking Journey link
20/1/2023 12:06:14 pm

Hey Nikki, 45 minutes!

Thank you

Reply
Anna
8/6/2020 04:19:44 pm

Thank you so much! Looking forward to make this one.

Reply
Our Cooking Journey link
20/1/2023 12:07:01 pm

Thank you Anna! Share with us the outcome on Instagram and Facebook, we would love to see it.

Thank you

Reply


Leave a Reply.

  • Home
  • About
  • Contact
  • Recipes
  • Blog
  • Cooking Classes
  • Corsi di Cucina